Monday, April 22, 2024

T Stands For Sally's Birthday


I realize you must be tired of reading this, but I STILL cannot leave comments to anyone who uses embedded comments.  I get "failed to publish," and I get the same message every time. This is very frustrating.  I appreciate your patience and understanding that it is not me because I do visit and leave, or try to leave, a comment.

Instead of sharing my bEARTHday, I am sharing my foodie friend Sally's birthday which was the 28th of March.

I asked my friend Sally where she wanted to go on her birthday

and she chose China Inn.  Not a choice I would have made, but it was her birthday, not mine.

We had what we always had when we went there.   It included shrimp chow mein, sweet and sour chicken, fried rice, and egg roll.  I had water with lemon, you might be able to see in the background.

This is Sally's favorite.  Not sure how I failed to get her face in the photo.

When we first got there, I told the waitress it was Sally's birthday.  Note Sally's water.  My ticket to the T party today.

Sally decided to take a photo of the ice cream and candle. 

Even though the waitress included two spoons, Sally didn't offer to share (grin).

It's now time to share your own drink related post.  It can be photos, a place you visited, movies, postcards, books, sketches, mixed media, drawings, paintings, tags, scrapbooking, or other art that is digital, hybrid, or traditional, as long as it in some way relates back to a drink, any drink.  Regardless, please share below and Bleubeard and I, along with the rest of the T gang will be by to visit.   Please link only your T post and not your blog in general.  Old photos are acceptable because they may be taken any time, not just on Tuesday.   Be sure to visit the other T Tuesday participants.  


I will not be around to join you for T until much later tonight.  Two of my No Name, No Photos Allowed friends are taking me to dinner.  We meet at 5 p.m. for "drinks" (mine will definitely be non-alcoholic), then we have reservations at 7 p.m. for a very exclusive restaurant.  I've insisted NO GIFTS allowed.


It's bEARTHday


Please be aware I STILL cannot leave comments to anyone who uses embedded comments.  I get "failed to publish," and, even though I keep trying, I get the same message every time. This is very frustrating.  I appreciate your patience and understanding that it is not me because I do visit and leave a comment.

Today is Earth Day (although every day should be Earth Day).  It's also the day of my birth.  There are 193 countries participating in Earth Day today.  Yours is surely one of them.

For 2024, the theme is one that is near and dear to me: Planet vs. Plastic.  Long time readers and visitors to my blog know how I feel about plastic.  It is one of, and possibly the worst invention ever. 

However, let's go back to the first ever Earth Day.  If you've been around my blog for years, or you are aware of Earth Day, you know it was originally created by Senator Gaylord Nelson and intended to be a teach-in on various campuses across the nation.  Teach-ins are actually debates and who really would debate in favor of pollution, bad water, or dirtier oceans?  That was when the focus was changed and, instead of having an Earth Day celebration solely on college campuses, it was decided that the event should also be held in community centers and parks.

Although Gaylord Nelson gets all the credit for Earth Day, way back in the late 1950s, Rachel Carson, an American marine biologist, began looking into  pesticides first used by soldiers in WWII.  Before that, she was concerned about the synthetic pesticides created by the military after the war.  In 1957, the Dept. of Agriculture tried to eradicate fire ants using DDT and fuel oil to spray on private land.  One such place was Long Island, New York.  She learned that not only were the fire ants NOT eradicated, dogs, birds, and horses WERE (Lear, Linda,  Rachel Carson: Witness for Nature, pp. 117–124).  

Some of your parents or grandparents may remember that there were no cranberries for sale in 1957 through 1959.  A specific herbicide was over-sprayed and the cranberry crops had to be halted (Lear, p. 22).

It was then Carson decided to write a book documenting research of the chemical spraying programs funded by the Dept. of Agriculture and corporations that made the chemicals.  The book is called Silent Spring.  It was published in 1962 and was the forerunner that led to the creation of the Environmental Protection Agency (EPA).

If you want to celebrate Earth Day, do something for the environment.  Pick up trash along a river, help clean up a park, plant a tree, or recycle old electronics.  

If you are unable to do any of those and plan to go grocery shopping today, please DO NOT buy anything in plastic.  Glass jars, tin or metal cans, and paper/cardboard are acceptable.  I love using 1/2 and1/2 in my coffee because it comes in a cardboard container.  If you go out to eat and decide to bring some food home, I hope it's not in Styrofoam, which is a form of plastic.  Let's give plastic the boot!

Let's see what the rest of the world is creating today using recycled products. 

https://b2270777.smushcdn.com/2270777/wp-content/uploads/2020/09/jane-perkins-artactivist-recycled-materials-726x1024.jpg?lossy=1&strip=1&webp=1  Jane Perkins: The Raj's Emerald, a portrait using found materials

https://b2270777.smushcdn.com/2270777/wp-content/uploads/2020/09/Barefooted-Welder-scrap-metal-art-sculpture-australia-tiger.jpg?lossy=1&strip=1&webp=1  Barefooted Welder: Scrap metal sculptor from Australia who created Kali the cat

https://b2270777.smushcdn.com/2270777/wp-content/uploads/2020/09/Robert-Bradford-artactivist-sculpture-recycled-toys.jpg?lossy=1&strip=1&webp=1Robert Bradford: Horse sculpture made out of recycled toys

https://b2270777.smushcdn.com/2270777/wp-content/uploads/2020/09/steven-rodrig-PCB-sculpture-eletronic-waste-turtle.jpg?lossy=1&strip=1&webp=1   Steven Rodrig: Sea turtle sculpture using discarded electronics

https://b2270777.smushcdn.com/2270777/wp-content/uploads/2020/09/Nick-Gentry-artactivist-collages-recycled-media-857x1024.jpg?lossy=1&strip=1&webp=1   Nick Gentry: Portrait made of recycled media

https://b2270777.smushcdn.com/2270777/wp-content/uploads/2020/09/Derek-Gores-artactivist-collages-recycled-magazines-1024x1024.jpg?lossy=1&strip=1&webp=1  Derek Gores: Collage made from recycled magazines

https://b2270777.smushcdn.com/2270777/wp-content/uploads/2020/09/Erika-Iris-Simmons-artactivist-cassette-tape-bob-marley.jpg?lossy=1&strip=1&webp=1   Erika Iris Simmons: Bob Marley portrait made with old cassette tape

https://b2270777.smushcdn.com/2270777/wp-content/uploads/2020/09/TC-Trash-Art-1024x884-1.jpg?lossy=1&strip=1&webp=1  TC Trash Art: Daily art made from beach clean-ups in Florida

I hope you have enjoyed this look at what others consider art made from trash, waste, or recycled materials.  Have a fabulous Earth Day and please do something good for the planet today (and every day).

And a bit of PLASTIC humor before I go:

https://blogger.googleusercontent.com/img/b/R29vZ2xl/AVvXsEjKDpTRR91GVkIXarB0up5OPSutG2U-XSXjfQ-AA8eAw0KRo5Y86QDMgJnQ0Mm5q4LQ9cezW48BFgVO77L1wyfqTHQeCKkoUUOHe4f_9rfQ14asnt_cBDKFWKQqOijGdFQLnVqbW4sxDQuYvtZqKXZXR0i_XEzGoCs2-Ev47ZbkxlSnFbmuWcFtkAiNuw/s1102/400153aa79e8b01d24b03bdd2158e70f.jpg 

This is Day 22 of 22 and I shared how other artists respect the planet by using recycled, repurposed, and reused materials in their art.


Sunday, April 21, 2024

One final background


I am STILL unable to leave comments to anyone who uses embedded comments.  I get "failed to publish," and, even though I keep trying, I get the same message every time and have for three days. This is very frustrating, especially since I joined so many challenge blogs this week.  I appreciate your patience.

This is my final background I plan to create.  Tomorrow I will share a few bEARTHday dos and don'ts.

Supplies from left to right:

3 primary colors of your choice

Lid to roll pages

Old book pages

Raw umber (needed for technique)

For my primary colors, I chose Hansa Yellow Medium, Pyrole Red, and Ultramarine Blue.  As you can see, these are all relatively translucent.  Scrunch the book pages as tight as possible.  I had a lot of trouble with this step because of my hands and because the pages I chose were old and tended to crumble.

Place a bit of Raw Umber on the lid.

Roll the pages in the paint.  

Be sure all sides are covered.
 
Straighten pages and allow paint to dry.  The late afternoon sun was shining on my table making it hard to see these pages.

My favorite is the page that didn't crumble.

Once the paint is completely dry,
 
iron the pages.


Water down your lightest color paint to make it similar to a watercolor.  I used about 50% paint to water.  Paint it randomly on the pages.  I tried to paint in three different areas on each book page.  I loved how the paint settled into the pages after they had been ironed. 

I hadn't expected to have so much yellow left over, so I added a tiny bit two drops of red to the yellow and got a lovely orange.

Start with a new cup of red paint and water.  Add red to the pages.  You can either allow each color to dry before adding the next color, or you can let the wet colors merge.

Add your final color and fill in all the places where there had been no color before.

Although it's still wet, this is by far my favorite because it didn't crumble.

When completely dry, I scanned the two best pages:


Ruminations:

1. Use soft, pliable book pages for this technique.

2.  If the pages crumble when you scrunch them, your project is doomed.  

3.  Pick the size pages you want that will fit the proper background (i.e., if you are making cards, tags, or ATCs)

This is Day 21 of 22 and I recycled four book pages that had been removed from previous projects.

Again, I want to thank you beyond belief for joining me on this journey to recycle and repurpose items that would normally go to the trash, recycle bin, or languish in your stash for years and years.


Saturday, April 20, 2024

One final coffee background


I am once again unable to leave comments to anyone with embedded comments.  I get "failed to publish," and, even though I keep trying, I get the same message every time and have for two days.

Today I have a final coffee background for you to try.  You can always substitute with tea, although expect paler results.

Supplies from left to right:

Cardstock cut to 6 X 9 inches (15.24 X 22.86 centimeters)
 
Coffee (Dark Sumatra)

Recycled tissue paper torn larger than the cardstock

Brush 

Needed to spread white PVA glue, which I failed to include in the supply list.
 
Liberally spread the PVA glue all over the cardstock.  You may have to move it around to make sure you have gotten it everywhere.  You can see I missed a couple of places when I took the photo.
 
I crumpled the tissue paper, but probably should not have.  It made it harder to place on the cardstock.  Do as I say and not how I did!!

Smoosh the tissue until you have covered the cardstock with a sufficient amount of hills and valleys.

Allow to dry overnight.  This is a detail shot of the smooshed tissue on cardstock.  It is still quite wet.

Once completely dry, remove the excess tissue paper.  I used scissors, but you could also use your paper cutter.

Dip your brush in the coffee (or tea).  Be sure the brush is thoroughly saturated.

See how the coffee falls in the valleys and hits the hills of this lovely piece.  Be sure to wash your brush immediately.  Note how good your craft room or studio smells.

Late tonight, I sped the drying process by using my heat tool, or this would never have been dry before it was time to publish.

This is Day 20 of 22 and I recycled a sheet of used tissue paper to add to my coffee backgrounds.  
 
Thanks to all who have followed along this month.  I am sincerely grateful. 


Friday, April 19, 2024

A repurposed and recycled post


Today I'm sharing two posts I published in the past.  I'm sure some of you have seen these backgrounds before.  This is a very long post, and for that I apologize.  Tomorrow I will be back with a new background technique using recycled materials and coffee.  Please enjoy these backgrounds, even if you are not a coffee drinker.

For all of these techniques, I will be using 90 lb watercolor paper.  You can see the specifics here.

For all of these techniques, I have included these specific products.  I will add others as needed, but all will take these. From back to front:
Used pie tin
Instant coffee that got damp, then dried in one mass in my basement studio
Parchment paper (or any product that will keep excess water off your table)
Watercolor papers cut to 6 X 9 inches (15,24 X 22,9 cm)

For this first technique, we are going to do a bit of blowing.  I have included a spoon and a straw. 
 
 For the first technique, I withdrew blobs of coffee from the jar using the spoon.

Using the straw, I blew into it over the various blobs of coffee.


I had to remember to keep rotating the paper so the blobs were distributed.  Some of the coffee blobs overlapped each other.  I tried to wipe up the excess coffee using a paper (kitchen) towel (which I didn't think to show).

The next technique is quite simple.  I accidentally got some excess coffee on the paper when I was transferring the coffee to the pie tin, but didn't feel that would hurt anything.

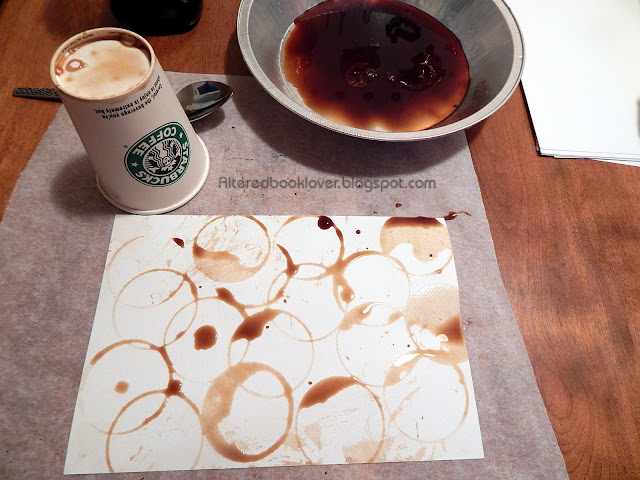
 I pressed the bottom of the take-out cup to the coffee in the pie tin and stamped circles on the watercolor paper.

I swiped the next watercolor paper on the parchment paper to remove excess coffee.  I wanted the effect.  I have added another "stamp" from my stash of things with which to stamp. 

I was really very happy with the marks this made.

I couldn't have been more pleased.

Then I turned the "stamp" over and stamped the other side at a 90 degree angle.

This made me very happy, too.
 
I look forward to seeing this one after it's dry.

These three are finally dry.  I see a great deal of potential for great backgrounds.
 
Now let's play with a little resist.  I'm using sea salt, but I might throw in a bit of rock salt, too.

I have to add coffee to the watercolor paper first, though.

After adding the sea salt, I applied more coffee so it would saturate the salt.

While the other paper was drying, I decided to play with my food.

Rice absorbed the coffee nicely.

Once the rice was dry, and it had been removed from the paper,

this became my favorite design.  Personally, I'd like to make about a dozen of these.

What was possibly more interesting was when I turned the watercolor paper over.  The pattern on the back was note-worthy, too. 

Who knew rice could be so interesting from an art standpoint.

Finally, it was time to remove the sea salt from the watercolor paper.
 
This pattern was interesting, but what I was most pleased with

was how the coffee sparkled when I moved it back and forth in my hand.  Sadly, the camera doesn't pick up that sparkle.  
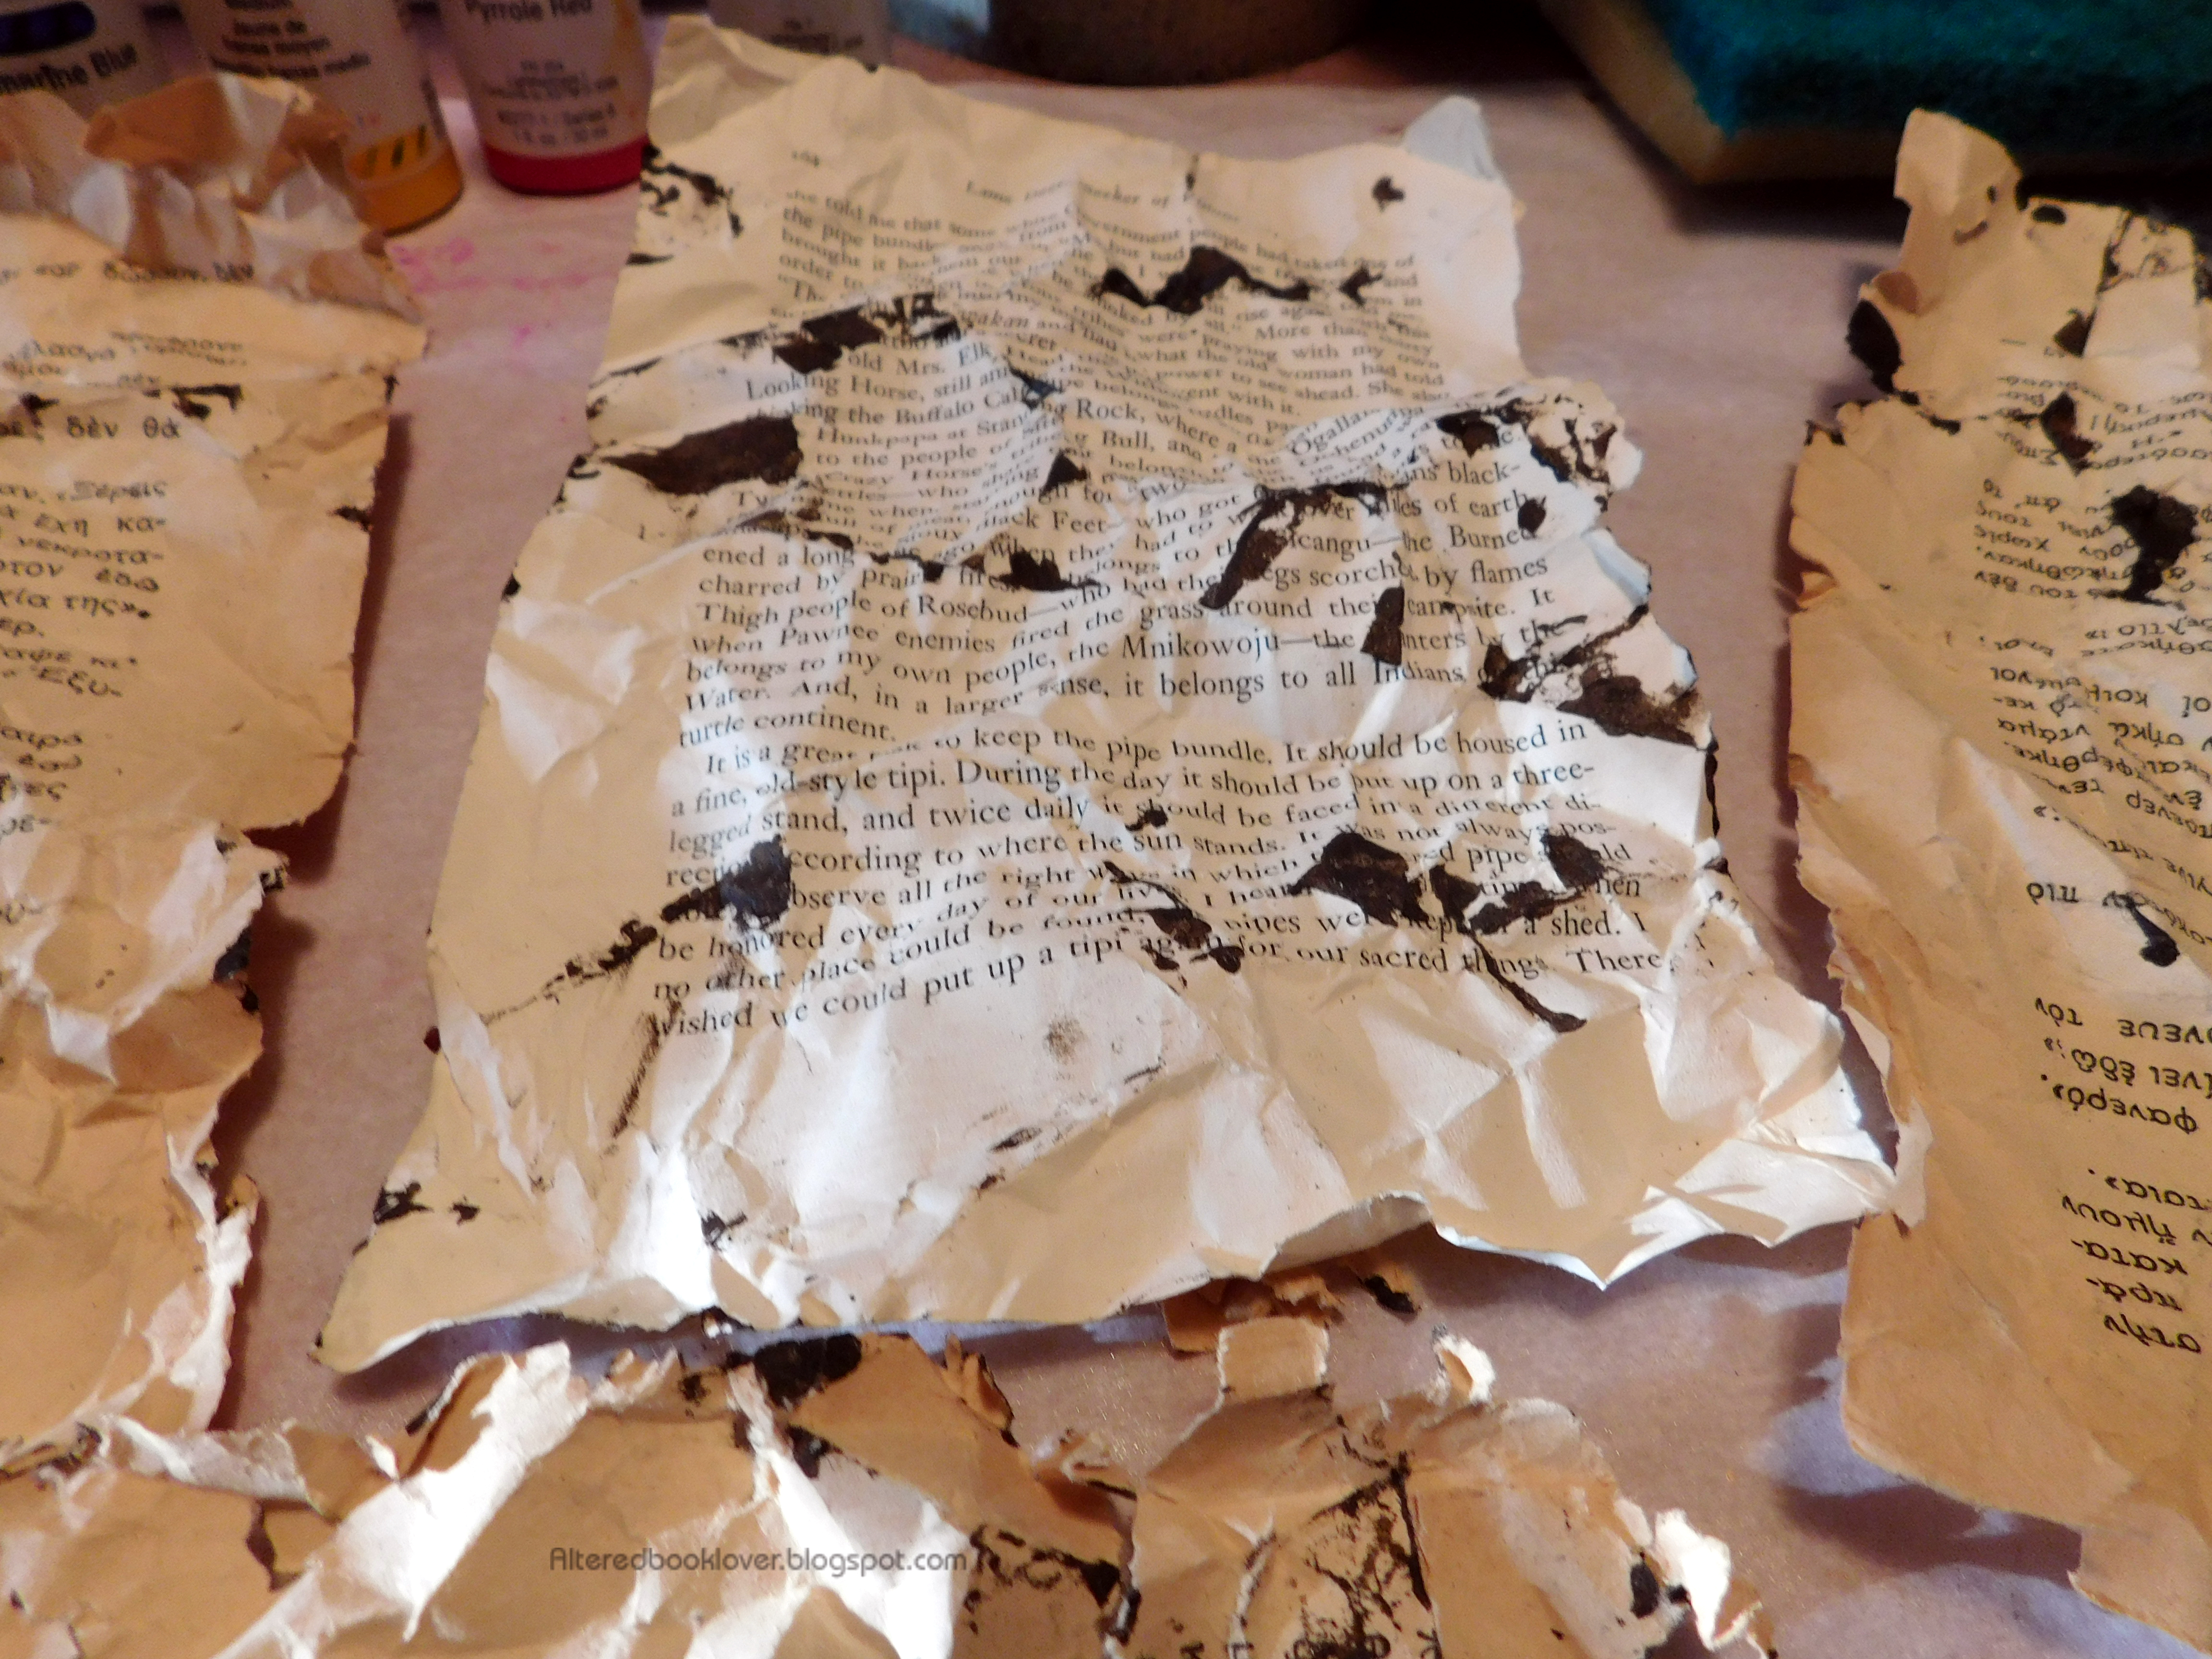
For this technique, I started by saturating a sheet of watercolor paper with coffee.  The shiny item in the background is cling wrap.

I've laid the cling wrap in place,

then scrunched the cling wrap to create patterns.

Unlike in the past, I allowed the coffee to completely dry under the cling wrap before I removed it.

It was at that time, I decided to update everyone with what I had created to date.

It was now time for my next technique,

but first, I had to saturate the watercolor paper with coffee.
It was then time to add the coffee crystals to the wet paper, much like I added the salt and rice in the previous post.  This time, the crystals dissolved into patterns.

For my next technique

I first soaked wax linen thread in coffee for a few days to soak up the coffee.

When I added more coffee, I kept moving the string.  Very frustrating.

It turned out better than I expected, but still left a few open spots in the grid.

For my final technique, I grabbed the Dawn I keep close at hand to wash my hands about a thousand times a day,

and a whisk.

Although I used the whisk to create froth, I fear I didn't use enough Dawn.

The froth wasn't as frothy as I had hoped.

As it dried, the froth didn't act as I envisioned it should.

Only one spot looked as I had envisioned the experiment.

This is how it looked when it was dry.

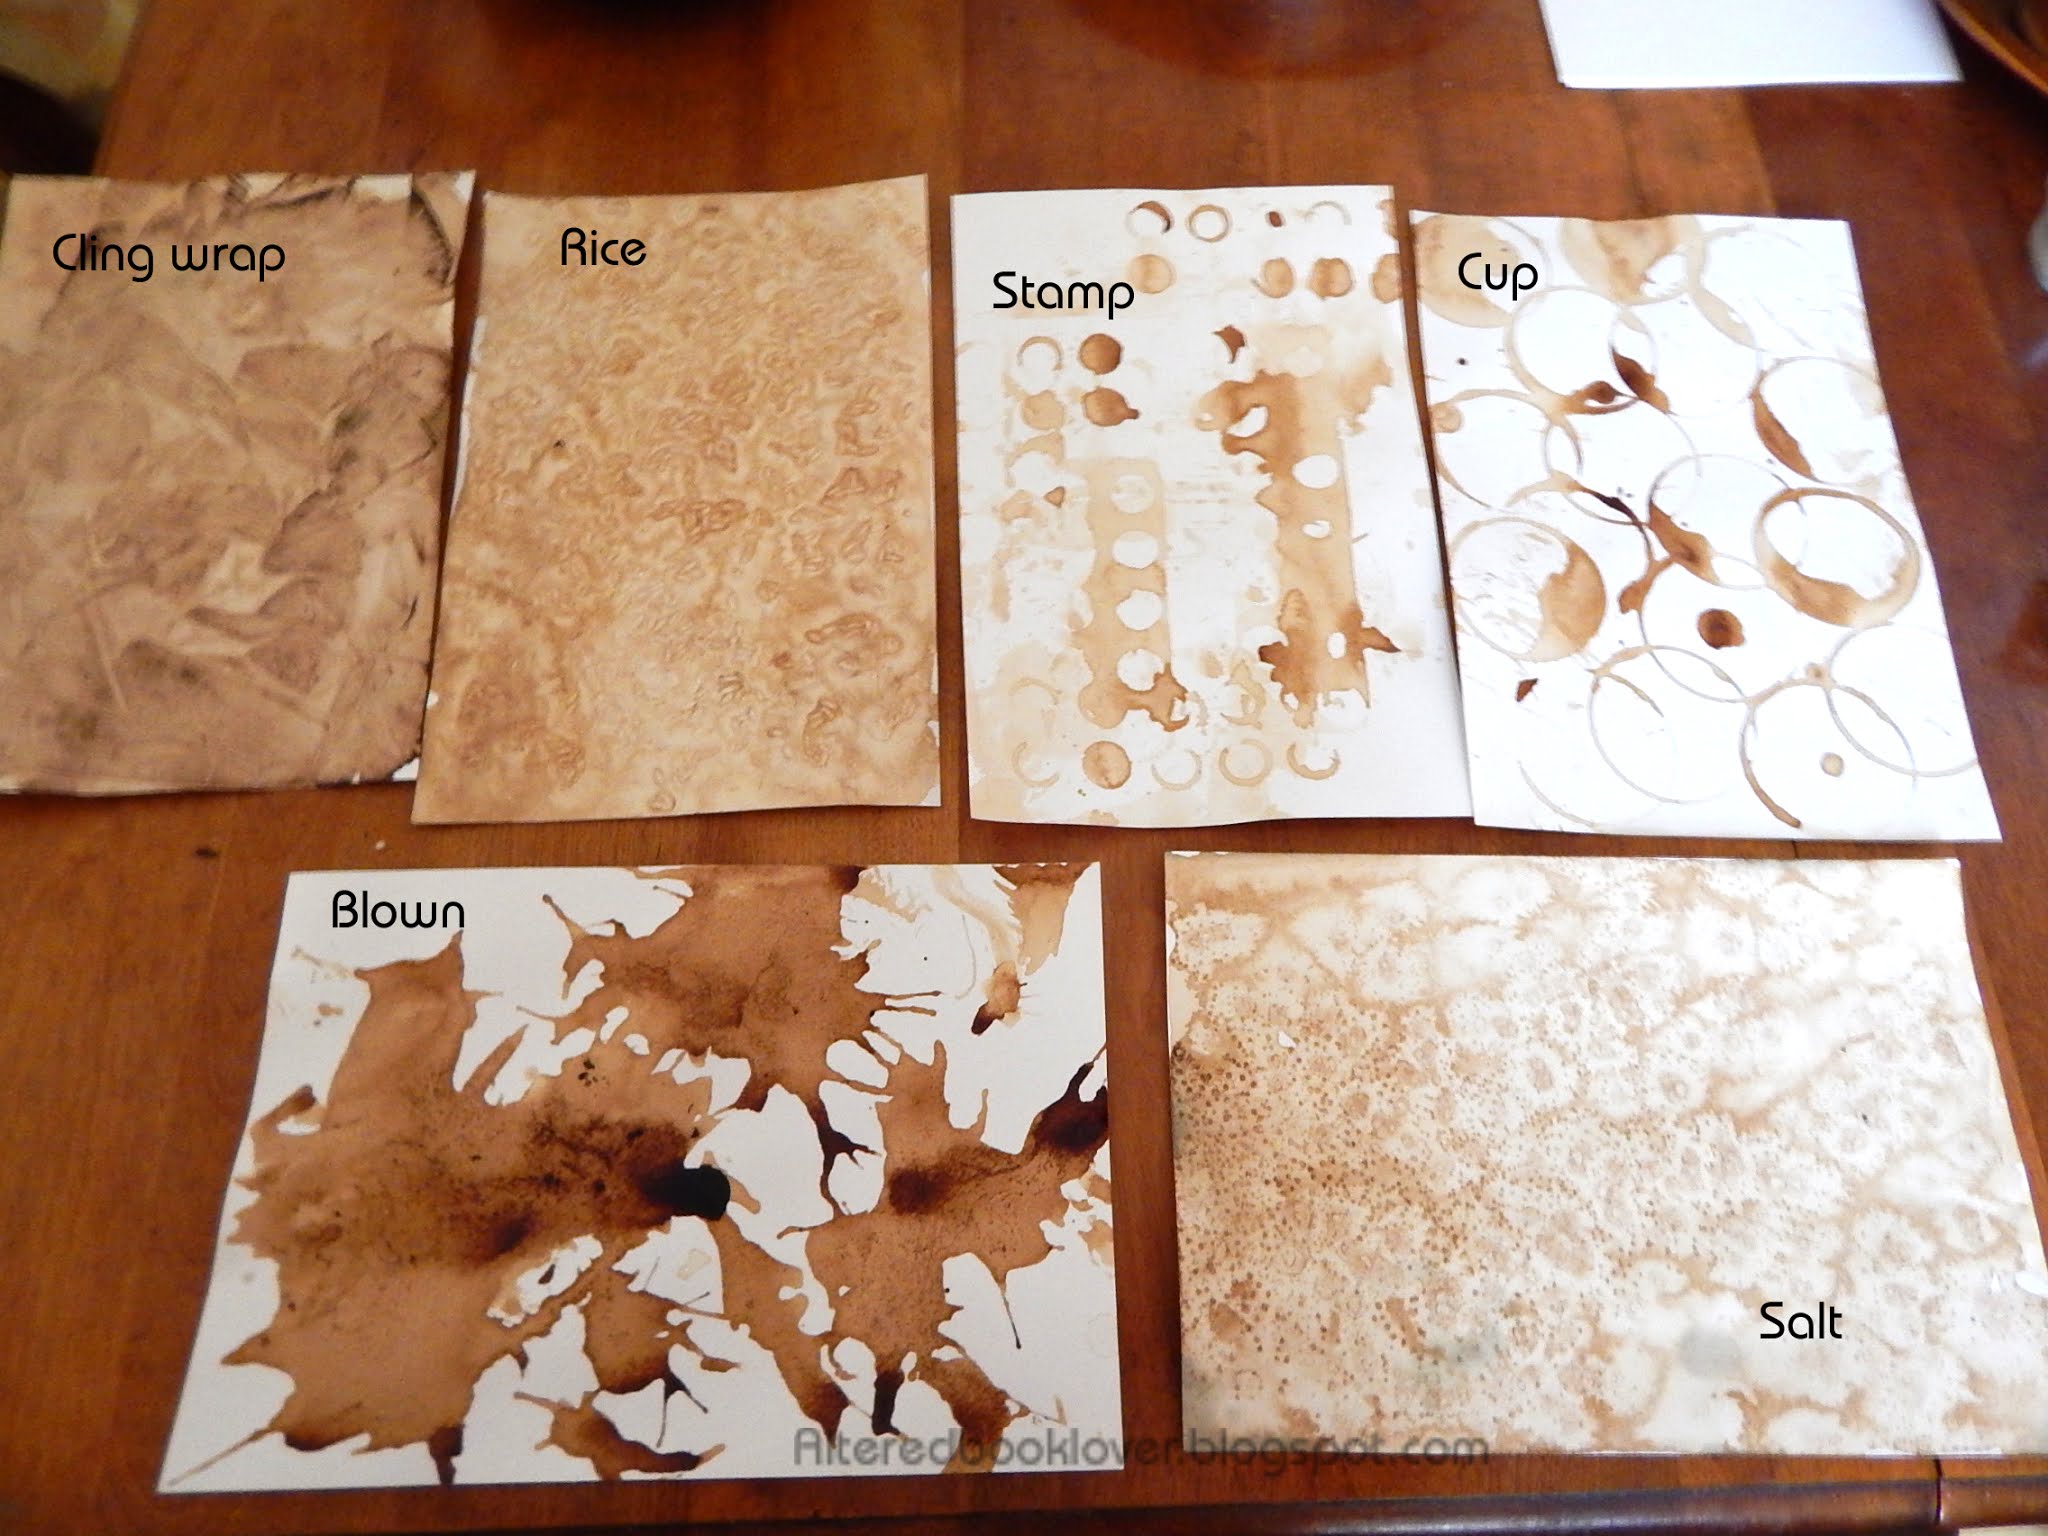
These are all the experiments

I created for both tutorials.

If you have a technique for making coffee backgrounds that I haven't thought of, please let me know and I will try it.

Ruminations:

1. A few of these backgrounds turned out better in my head than on paper.

2. I used a paper/kitchen towel to wipe up excess coffee, but when I did, I often disturbed the pattern.  I'm sure there is a magic amount of coffee that should be used with this paper, but I haven't found it yet.

3. I need an area where I can dry my papers.  I had to wait while some dried because I didn't have enough space on my table and counter to dry all of these at once.

4.  By far and away, my favorite was the watercolor paper and rice.

This is Day 19 of 22 and I recycled two posts on creating backgrounds using coffee.   Thanks to all for your continued interest in this month's project.